唠嗑唠嗑
之前都在备考信息系统项目管理师去了,网站域名过期都没注意(⊙o⊙)…。现在换了个新域名(✿✿ヽ(°▽°)ノ✿),恢复更新(虽然可能大概应该似乎好像maybe,probably没啥人看)。
最近还在系统学习乐理,打算再玩玩编曲,有感兴趣的小伙伴可以联系我哈,一起学习ヽ( ̄ω ̄( ̄ω ̄〃)ゝ。
Vuex 状态管理
0、学习目标
- Vue 组件间通信方式回顾(当项目比较复杂,多个组件共享状态的时候,使用组件间通信的方式较麻烦且不易维护,所以需要一种方式去解决这个问题,这时就可以考虑使用集中式的解决方案Vuex)
- Vuex核心概念和基本使用回顾。
- 通过一个简单的案例去演示Vuex在项目中如何使用。
- 当掌握了Vuex的使用之后,我们再来手写一个简易版本的Vuex,了解Vuex内部是如何工作的。
这也是我们学习的一般路径,当我们学习一个新事物的时候,一般都是从概念开始,再结合使用,最后学习原理。比如这里我们先了解Vuex是什么,然后了解Vuex的基本使用,以及结合项目去使用,最后再去学习它的原理。
1、组件内的状态管理流程
在介绍组件通信之前,我们先来回顾一下什么是状态管理,这里我们可以通过组件内的状态管理流程来对状态管理进行回顾。
Vue中最核心的两个功能分别是数据驱动和组件化,使用基于组件化的开发可以提高我们的开发效率带来更好的可维护性。我们先通过一段代码,回顾一下组件的基本结构。
new Vue({
    // state
    data () {
        return {
        	count: 0
        }
    },
    // view
    template: `
    	<div>{{ count }}</div>
    `,
    // actions
    methods: {
        increment () {
        	this.count++
        }
    }
})
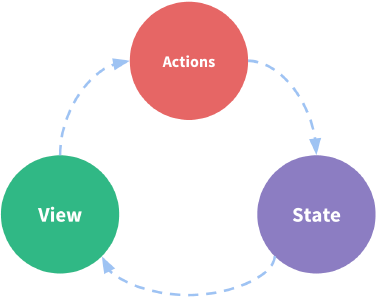
我们知道每一个组件的内部都有自己的数据、模板以及方法。数据,我也可以称之为状态,每个组件内部都可以管理自己的内部状态。模板,我们也可以称之为视图,每个组件也都有自己的视图,把状态绑定到视图上呈现给用户。当用户和视图交互的时候可能会更改状态,比如用户点击按钮的时候让看到的值发生变化,当状态发生变化后会自动更新视图,而更改状态的部分我们可以称之为actions,也即行为。
这里,我们所描述的是单个组件内的状态管理,而在实际开发过程中可能多个组件都要共享状态。我们所说的状态管理其实也就是通过状态集中管理和分发解决多个组件共享状态的问题。
下面我们再来看看状态管理的组成:
- state,也即我们所说的状态,或称之为驱动应用的数据源。
- view,视图,通过把状态绑定到视图呈现给用户,即以声明的方式将 state 映射到视图。
- actions,用户和视图交互而改变视图的方式,即响应在 view 上的用户输入导致的状态变化。
我们再来用一张图来描述整个过程:

这里的箭头表示数据的流向,此时数据的流向是单向的,State状态也即数据,数据绑定到视图,展示给用户,当用户和视图交互,即通过Actions更改数据后,再把更改后的数据重新绑定到视图View。从上图中我们发现,单向的数据流程非常清晰,但多个组件共享数据的时候就会破坏这种简单的结构,下文我们就会回顾组件间是如何通信的。
2、组件间通信方式回顾-父组件给子组件传值
大多数场景下的组件都并不是独立存在的,而是相互协作共同构成了一个复杂的业务功能。在 Vue 中为不同的组件关系提供了不同的通信规则。
常见的组件间通信的方式有三种:
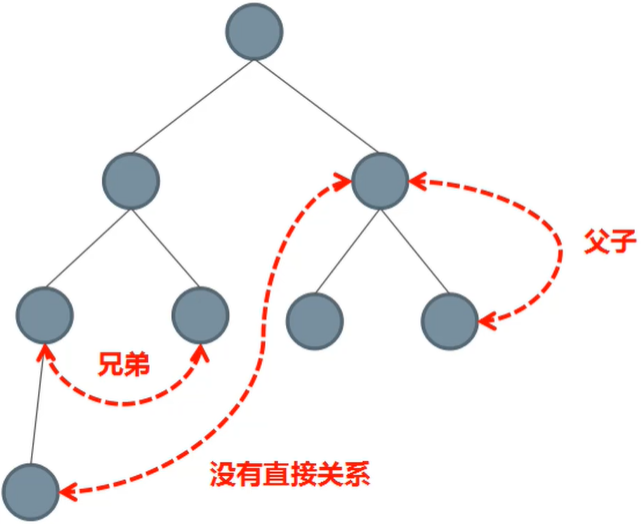
各组件关系相关图示:

首先来看父组件给子组件传值:
- 子组件中通过props接收父组件传递的数据
- 父组件中给子组件通过相应属性传值
子组件Child.vue:
<template>
  <div>
    <h1>Props Down Child</h1>
    <h2>{{ title }}</h2>
  </div>
</template>

<script>
export default {
  // props可为数组或对象,当为对象时可设置数据类型
  // props: ['title'],
  props: {
    title: String
  }
}
</script>

<style>

</style>父组件Parent.vue:
<template>
  <div>
    <h1>Props Down Parent</h1>
    <!-- 在模板中使用title给子组件传值 -->
    <child title="My journey with Vue"></child>
  </div>
</template>

<script>
// 首先注册子组件
import child from './Child'
export default {
  components: {
    child
  }
}
</script>

<style>

</style>
3、组件间通信方式回顾-子组件给父组件传值
子组件:
<template>
  <div>
    <h1 :style="{ fontSize: fontSize + 'em' }">Props Down Child</h1>
    <button @click="handler">文字增大</button>
  </div>
</template>

<script>
export default {
  props: {
    // 子组件中通过props接收父组件传递的字体大小
    fontSize: Number
  },
  methods: {
    // 当触发handler自定义事件(点击按钮)的时候,
    // 通过$emit去触发父组件自定义事件enlargeText去放大字体
    handler () {
      this.$emit('enlargeText', 0.1)
    }
  }
}
</script>

<style>

</style>
父组件:
<template>
  <div>
    <h1 :style="{ fontSize: hFontSize + 'em'}">Event Up Parent</h1>

    这里的文字不需要变化

    <!-- 在使用这个组件的时候,使用 v-on 监听这个自定义事件 -->
    <child :fontSize="hFontSize" v-on:enlargeText="enlargeText"></child>
    <child :fontSize="hFontSize" v-on:enlargeText="enlargeText"></child>
    <!-- 还可以用下面的方式使用$event来获取传递的值(事件处理函数中不能用) -->
    <child :fontSize="hFontSize" v-on:enlargeText="hFontSize += $event"></child>
  </div>
</template>

<script>
import child from './Child'
export default {
  components: {
    child
  },
  data () {
    return {
      hFontSize: 1
    }
  },
  methods: {
    // 父组件自定义事件中接受子组件传递的参数
    enlargeText (size) {
      this.hFontSize += size
    }
  }
}
</script>

<style>

</style>
子组件向父组件传值的核心是子组件触发事件时传递参数,然后在父组件中注册子组件内部触发的事件,并接收传递的数据,完成子向父的传值。另外在注册事件的时候,行内可以通过$event去获取事件传递的参数,但在事件处理函数中是不能使用的。
参看:使用事件抛出一个值
4、组件间通信方式回顾-不相关组件传值
不相关组件的通信也是使用自定义事件的方式,但和子给父传值不同的是,因为没有父子关系,所以不能再由子组件触发事件传值,所以这里需要使用eventbus,也即创建一个公共的vue实例,此实例的作用就是作为事件组件(或中心)。
eventbus.js(此文件非常简单,仅仅是导出了vue实例,使用它的目的是为了调用它的$emit和$on,用来触发和注册事件):
import Vue from 'vue'
export default new Vue()
Sibling-01.vue
<template>
  <div>
    <h1>Event Bus Sibling01</h1>
    <div class="number" @click="sub">-</div>
    <input type="text" style="width: 30px; text-align: center" :value="value">
    <div class="number" @click="add">+</div>
  </div>
</template>

<script>
import bus from './eventbus'

export default {
  props: {
    // num为文本框想要默认显示的数字,
    // 因为props的值不建议直接修改,所以在created里存到了value中
    num: Number
  },
  created () {
    this.value = this.num
  },
  data () {
    return {
      value: -1
    }
  },
  methods: {
    sub () {
      if (this.value > 1) {
        this.value--
        bus.$emit('numchange', this.value)
      }
    },
    add () {
      this.value++
      bus.$emit('numchange', this.value)
    }
  }
}
</script>

<style>
.number {
  display: inline-block;
  cursor: pointer;
  width: 20px;
  text-align: center;
}
</style>
Sibling-02.vue
<template>
  <div>
    <h1>Event Bus Sibling02</h1>

    <div>{{ msg }}</div>
  </div>
</template>

<script>
import bus from './eventbus'
export default {
  data () {
    return {
      msg: ''
    }
  },
  created () {
    bus.$on('numchange', (value) => {
      this.msg = `您选择了${value}件商品`
    })
  }
}
</script>

<style>

</style>
App.vue
<template>
  <div id="app">
    <h1>不相关组件传值</h1>
    <sibling0301 :num="num"></sibling0301>
    <sibling0302></sibling0302>
  </div>
</template>

<script>
import sibling0301 from './components/event-bus/Sibling-01'
import sibling0302 from './components/event-bus/Sibling-02'


export default {
  name: 'App',
  components: {
    sibling0301,
    sibling0302,
  },
  data () {
    return {
      num: 1
    }
  }
}
</script>

<style>
</style>
不相关组件传值的核心还是使用自定义事件传递数据,因为没有父子关系,所以我们需要一个中介,通过中介来注册和触发事件。这里的eventbus就是中介或者称为「事件中心」。
5、组件间通信方式回顾-通过 ref 获取子组件
ref 有两个作用:
- 如果在普通的HTML标签上使用ref,则通过$refs获取到的是DOM对象。
- 如果在组件的标签上使用ref,则通过$refs获取到的是组件对象。
子组件:
<template>
  <div>
    <h1>ref Child</h1>
    <input ref="input" type="text" v-model="value">
  </div>
</template>

<script>
export default {
  data () {
    return {
      value: ''
    }
  },
  methods: {
    focus () {
      // 可以通过$refs来获取input标签对应的DOM对象然后调用他的focus方法
      this.$refs.input.focus()
    }
  }
}
</script>

<style>

</style>
父组件:
<template>
  <div>
    <h1>ref Parent</h1>

    <child ref="c"></child>
  </div>
</template>

<script>
import child from './Child'
export default {
  components: {
    child
  },
  // 这里想要拿到子组件对象的话,需要等组件渲染完毕,所以需要使用mounted
  mounted () {
    this.$refs.c.focus()
    this.$refs.c.value = 'hello input'
  }
}
</script>

<style>

</style>
注意,这种方式不再万不得已的情况下不要使用。如果滥用这种方式的话,会导致数据管理的混乱。
$refs 只会在组件渲染完成之后生效,并且它们不是响应式的。这仅作为一个用于直接操作子组件的“逃生舱”——你应该避免在模板或计算属性中访问 $refs 。
6、简易的状态管理方案
如果多个组件之间要共享状态(数据),使用之前的方式虽然可以实现,但是比较麻烦,而且多个组件之间互相传值很难跟踪数据的变化,如果出现问题很难定位问题。
当遇到多个组件需要共享状态的时候,典型的场景:购物车。我们如果使用之前的方案都不合适,我们会遇到以下的问题:
- 多个视图依赖于同一状态,如果多层嵌套的组件依赖于同一状态,使用父子组件传值可以实现,但是非常麻烦,且不易管理。
- 来自不同视图的行为需要变更同一状态,我们可以使用父子组件的方式获取状态进行修改,或通过事件机制来改变或同步状态的变化。
对于问题一,传参的方法对于多层嵌套的组件将会非常繁琐,并且对于兄弟组件间的状态传递无能为力。
对于问题二,我们经常会采用父子组件直接引用或者通过事件来变更和同步状态的多份拷贝。以上的这些模式非常脆弱,通常会导致无法维护的代码。
因此,我们为什么不把组件的共享状态抽取出来,以一个全局单例模式管理呢?在这种模式下,我们的组件树构成了一个巨大的“视图”,不管在树的哪个位置,任何组件都能获取状态或者触发行为!
我们可以把多个组件的状态,或者整个程序的状态放到一个集中的位置存储,并且可以检测到数据的更改。你可能已经想到了 Vuex。
这里我们先自己以一种简单的方式来实现:
- 首先创建一个共享的仓库store.js
// 在store中我们导出了一个对象,可以称之为「状态仓库」
export default {
  // debug属性方便调试,当debug为true的时,通过action修改数据就会打印日志。
  debug: true,
  // state用来存储数据
  state: {
    user: {
      name: 'xiaomao',
      age: 18,
      sex: '男'
    }
  },
  // action是通过视图在和用户交互的时候用来更改state的
  setUserNameAction (name) {
    if (this.debug) {
      console.log('setUserNameAction triggered:', name)
    }
    this.state.user.name = name
  }
}
这是集中式的状态管理,我们所有的状态都在store中进行管理,并且store是全局唯一的对象,任意的组件都可以导入store模块使用其中的状态。更改状态也是在该模块中实现的,再通过特殊的手段,还可以记录每次状态的变化。
- 把共享的仓库 store 对象,存储到需要共享状态的组件的 data 中
componentA.vue
<template>
  <div>
    <h1>componentA</h1>
    user name: {{ sharedState.user.name }}
    <button @click="change">Change Info</button>
  </div>
</template>

<script>
import store from './store'
export default {
  methods: {
    change () {
      // 自定change事件,触发时调用store的action改变state
      store.setUserNameAction('componentA')
    }
  },
  data () {
    return {
      // privateState存储组件自己的状态
      privateState: {},
      // 把store的state存储到当前组件的sharedState中
      sharedState: store.state
    }
  }
}
</script>

<style>

</style>
componentB.vue
<template>
  <div>
    <h1>componentB</h1>
    user name: {{ sharedState.user.name }}
    <button @click="change">Change Info</button>
  </div>
</template>

<script>
import store from './store'
export default {
  methods: {
    change () {
      store.setUserNameAction('componentB')
    }
  },
  data () {
    return {
      privateState: {},
      sharedState: store.state
    }
  }
}
</script>

<style>

</style>
App.vue
<template>
  <div id="app">
    <h1>简易的状态管理</h1>
    <componentA></componentA>
    <componentB></componentB>
  </div>
</template>

<script>
import componentA from './components/easystate/componentA'
import componentB from './components/easystate/componentB'


export default {
  name: 'App',
  components: {
    componentA,
    componentB
  },
}
</script>

<style>
</style>
这里我们采用了集中式的状态管理,使用了全局唯一的对象store来存储状态,并且有共同的约定,组件不允许直接变更属于 store 对象的 state,而应执行 action 来分发(dispatch) 事件通知 store 去改变,这样最终的样子跟 Vuex 的结构就类似了。这样约定的好处是,我们能够记录所有 store 中发生的 state 变更,同时实现能做到记录变更、保存状态快照、历史回滚/时光旅行等先进的调试工具。
7、Vuex概念回顾
Vuex 是什么?
Vuex 是一个专为 Vue.js 应用程序开发的状态管理模式。它采用集中式存储管理应用的所有组件
的状态,并以相应的规则保证状态以一种可预测的方式发生变化。Vuex 也集成到 Vue 的官方调试工具 vuejs/devtools⚙️ ,提供了诸如零配置的 time-travel 调试、状态快照导入导出等高级调试功能。
- Vuex 是专门为 Vue.js 设计的状态管理库。
- 它采用集中式的方式存储需要共享的数据(状态),同时还提供一种模块的机制,让我们按模块划分不同功能的模块。
- 从使用角度,它就是一个 JavaScript 库。
- 它的作用是进行状态管理,解决复杂组件通信,数据共享。
- Vuex 集成到了 devtools 中,提供了 time-travel 时光旅行历史回滚功能。
什么情况下使用 Vuex
官方文档:
Vuex 可以帮助我们管理共享状态,并附带了更多的概念和框架。这需要对短期和长期效益进行权衡。
如果您不打算开发大型单页应用,使用 Vuex 可能是繁琐冗余的。确实是如此——如果您的应用够简单,您最好不要使用 Vuex。一个简单的 store 模式就足够您所需了。但是,如果您需要构建一个中大型单页应用,您很可能会考虑如何更好地在组件外部管理状态,Vuex 将会成为自然而然的选择。引用 Redux 的作者 Dan Abramov 的话说就是:Flux 架构就像眼镜:您自会知道什么时候需要它。
当你的应用中具有以下需求场景的时候:
- 多个视图依赖于同一状态
- 来自不同视图的行为需要变更同一状态
建议符合这种场景的业务使用 Vuex 来进行数据管理,例如非常典型的场景:购物车。
注意:Vuex 不要滥用,不符合以上需求的业务不要使用,否则会让你的应用变得更麻烦。
8、Vuex 的核心概念
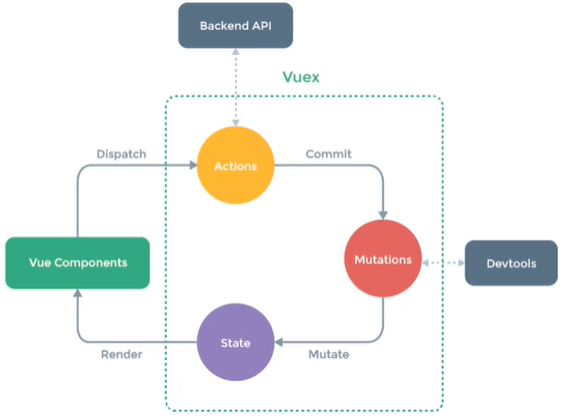
下图展现了Vuex的核心概念,并演示了整个工作流程:

State是管理全局的状态,把状态绑定到组件,也即视图上,渲染到用户界面展示给用户。用户可以和视图交互,比如点击购买按钮去支付时,通过dispatch分发action,不过此处不直接提交mutation,因为action中可以做异步的操作,购买的时候要发送异步请求,当异步请求结束的时候,再通过mutation记录状态的更改。mutation必须是同步的,所有状态的更改都必须要经过mutation,这样做就可以通过mutation追踪到所有状态的变化,阅读代码的时候更容易分析应用内部的状态改变,还可以记录每次状态的改变来实现高级的调试功能如time-travel和历史回滚等。
Vuex核心概念:
- Store:Store是使用Vuex应用的核心,每一个应用仅有一个Store,Store是一个容器,包含应用中的大部分状态,不过我们不能直接改变Store中的状态,而要通过mutation的方式改变状态。
- State:State就是状态,保存在Store中,因为Store是唯一的,所以我们的状态也是唯一的,称为单一状态树,但所有的状态都保存在state中的话,会让程序难以维护,可以通过后续的模块解决该问题。注意这里的状态时响应式的。
- Getter:Getter就像是Vue中的计算属性,方便从一个属性派生出其他的值,他的内部可以对结果进行缓存,只有当依赖的状态发生改变的时候,才会重新计算。
- Mutation:状态的变化必须要通过提交Mutation去完成。
- Action:Action和Mutation类似,不同的是Action可以进行异步的操作,内部改变状态的时候,都需要提交mutation。
- Module:由于使用单一状态树,应用的状态会集中到一个比较大的对象中来,当应用变得非常复杂时,Store对象就有可能变得相当臃肿,为了解决以上的问题,Vuex允许我们将Store分割成模块,每个模块拥有我们的State,Mutation,Action,Getter甚至是嵌套的子模块。
9、基本代码结构
src/store/index.js
import Vue from 'vue'
import Vuex from 'vuex'

// vuex和vue-router都是Vue的插件,插件内部把vuex的store注入到vue的实例上
Vue.use(Vuex)

export default new Vuex.Store({
  state: {
  },
  getters: {
  },
  mutations: {
  },
  actions: {
  },
  modules: {
  }
})
src/main.js
import Vue from 'vue'
import App from './App.vue'
import router from './router'
import store from './store'

Vue.config.productionTip = false

new Vue({
  router,
  // store选项会被注入到vue实例中,我们在组件中使用到的this.$store就是在这个位置注入的
  store,
  render: h => h(App)
}).$mount('#app')
10、State
State是单一状态树,里面集中存储所有的状态数据,并且是响应式的。
基本使用:
src/store/index.js
import Vue from 'vue'
import Vuex from 'vuex'

Vue.use(Vuex)

export default new Vuex.Store({
  state: {
    count: 0,
    msg: 'Hello Vuex'
  },
  getters: {
  },
  mutations: {
  },
  actions: {
  },
  modules: {
  }
})
src/App.vue
<template>
  <div id="app">
    <h1>Vuex - Demo</h1>
    count:{{ $store.state.count }} <br>
    msg: {{ $store.state.msg }}
  </div>
</template>

<style>
#app {
  font-family: Avenir, Helvetica, Arial, sans-serif;
  -webkit-font-smoothing: antialiased;
  -moz-osx-font-smoothing: grayscale;
  text-align: center;
  color: #2c3e50;
}

#nav {
  padding: 30px;
}

#nav a {
  font-weight: bold;
  color: #2c3e50;
}

#nav a.router-link-exact-active {
  color: #42b983;
}
</style>
Vuex 内部还提供了 mapState 函数帮助我们轻松生成状态对应的计算属性来简化 State 在视图中的使用。
mapState 有两种使用的方式:
- 接收数组参数
<template>
  <div id="app">
    <h1>Vuex - Demo</h1>
    count:{{ count }} <br>
    msg: {{ msg }}
  </div>
</template>

<script>
// 先导入 mapState
import { mapState } from 'vuex'
export default {
  computed: {
    // mapState会返回一个对象,包含两个计算属性对应的方法
    // 计算属性形式  count: state => state.count
    // 这里还需要使用扩展运算符...去展开返回对象的成员给computed
    ...mapState(['count', 'msg'])
  },
}
</script>

<style>
#app {
  font-family: Avenir, Helvetica, Arial, sans-serif;
  -webkit-font-smoothing: antialiased;
  -moz-osx-font-smoothing: grayscale;
  text-align: center;
  color: #2c3e50;
}

#nav {
  padding: 30px;
}

#nav a {
  font-weight: bold;
  color: #2c3e50;
}

#nav a.router-link-exact-active {
  color: #42b983;
}
</style>
但如果当前组件中,已经有了message和count两个属性,这时再使用这种方式就会有冲突,所以mapState还可以:
- 接收对象参数
<template>
  <div id="app">
    <h1>Vuex - Demo</h1>
    count:{{ num }} <br>
    msg: {{ msg }}
  </div>
</template>

<script>
import { mapState } from 'vuex'
export default {
  computed: {
    // 传递对象的话可以修改映射计算属性的名字
    ...mapState({ num: 'count', message: 'msg' }),
  },
}
</script>

<style>
#app {
  font-family: Avenir, Helvetica, Arial, sans-serif;
  -webkit-font-smoothing: antialiased;
  -moz-osx-font-smoothing: grayscale;
  text-align: center;
  color: #2c3e50;
}

#nav {
  padding: 30px;
}

#nav a {
  font-weight: bold;
  color: #2c3e50;
}

#nav a.router-link-exact-active {
  color: #42b983;
}
</style>
11、Getter
Vuex 中的 Getter 就类似于组件中的计算属性,如果想要对State中的数据做简单的处理再展示,就可以使用Getter。如把Message倒序输出,或过滤商品数据等。
src/store/index.js
import Vue from 'vue'
import Vuex from 'vuex'

Vue.use(Vuex)

export default new Vuex.Store({
  state: {
    count: 0,
    msg: 'Hello Vuex'
  },
  getters: {
    reverseMsg (state) {
      return state.msg.split('').reverse().join('')
    }
  },
  mutations: {
  },
  actions: {
  },
  modules: {
  }
})
src/App.vue
<template>
  <div id="app">
    <h1>Vuex - Demo</h1>
    count:{{ num }} <br>
    msg: {{ msg }}

    <h2>Getter</h2>
    reverseMsg: {{ $store.getters.reverseMsg }}
  </div>
</template>

<script>
import { mapState } from 'vuex'
export default {
  computed: {
    ...mapState({ num: 'count', message: 'msg' }),
  },
}
</script>

<style>
#app {
  font-family: Avenir, Helvetica, Arial, sans-serif;
  -webkit-font-smoothing: antialiased;
  -moz-osx-font-smoothing: grayscale;
  text-align: center;
  color: #2c3e50;
}

#nav {
  padding: 30px;
}

#nav a {
  font-weight: bold;
  color: #2c3e50;
}

#nav a.router-link-exact-active {
  color: #42b983;
}
</style>
同样,我们可以使用 mapGetters 来简化视图中的使用:
src/App.vue
<template>
  <div id="app">
    <h1>Vuex - Demo</h1>
    count:{{ num }} <br>
    msg: {{ msg }}

    <h2>Getter</h2>
    reverseMsg: {{ reverseMsg }}
  </div>
</template>

<script>
import { mapState, mapGetters } from 'vuex'
export default {
  computed: {
    ...mapState({ num: 'count', message: 'msg' }),
    // 和mapState类似,mapGetters同样返回一个对象,也可以接收数组和对象参数
    ...mapGetters(['reverseMsg']),
  },
}
</script>

<style>
#app {
  font-family: Avenir, Helvetica, Arial, sans-serif;
  -webkit-font-smoothing: antialiased;
  -moz-osx-font-smoothing: grayscale;
  text-align: center;
  color: #2c3e50;
}

#nav {
  padding: 30px;
}

#nav a {
  font-weight: bold;
  color: #2c3e50;
}

#nav a.router-link-exact-active {
  color: #42b983;
}
</style>
mapGetters 和 mapState 一样可以接收对象参数,且形式是也是一样的,在此不再赘述。
12、Mutation
以上,我们完成了如何在视图展示数据,接下来我们要实现在视图中去修改状态。
状态的修改必须通过提交mutation,mutation必须是同步执行的,这样才可以保证能够在mutation中收集到所有的状态修改。
Vuex 中的 mutation 非常类似于事件:每个 mutation 都有一个字符串的 事件类型 (type) 和 一个 回调函数 (handler)。这个回调函数就是我们实际进行状态更改的地方,并且它会接受 state 作为第一个参数。
src/store/index.js
import Vue from 'vue'
import Vuex from 'vuex'

Vue.use(Vuex)

export default new Vuex.Store({
  state: {
    count: 0,
    msg: 'Hello Vuex'
  },
  getters: {
    reverseMsg (state) {
      return state.msg.split('').reverse().join('')
    }
  },
  mutations: {
    // state为当前状态
    // payload是调用mutation时传入的额外参数,可以是对象
    increate (state, payload) {
      state.count += payload
    }
  },
  actions: {
  },
  modules: {
  }
})
src/App.vue
<template>
  <div id="app">
    <h1>Vuex - Demo</h1>
    count:{{ num }} <br>
    msg: {{ msg }}

    <h2>Getter</h2>
    reverseMsg: {{ reverseMsg }}

    <h2>Mutation</h2>
    <!-- 通过$store.commit来提交mutation, -->
    <!-- 第一个参数为要提交的mutation的名字,第二个参数是payload,即传递的数据 -->
    <button @click="$store.commit('increate', 2)">Mutation</button>
  </div>
</template>

<script>
import { mapState, mapGetters } from 'vuex'
export default {
  computed: {
    ...mapState({ num: 'count', message: 'msg' }),
    ...mapGetters(['reverseMsg']),
  },
}
</script>

<style>
#app {
  font-family: Avenir, Helvetica, Arial, sans-serif;
  -webkit-font-smoothing: antialiased;
  -moz-osx-font-smoothing: grayscale;
  text-align: center;
  color: #2c3e50;
}

#nav {
  padding: 30px;
}

#nav a {
  font-weight: bold;
  color: #2c3e50;
}

#nav a.router-link-exact-active {
  color: #42b983;
}
</style>
这里,我们可以同上面的mapGetters一样使用mapMutations,不同的是需要把mutation映射到当前组件的methods中:
src/App.vue
<template>
  <div id="app">
    <h1>Vuex - Demo</h1>
    count:{{ num }} <br>
    msg: {{ msg }}

    <h2>Getter</h2>
    reverseMsg: {{ reverseMsg }}

    <h2>Mutation</h2>
      <!-- 通过mapMutations后,调用increate只需要传递一个参数即可 -->
    <button @click="increate(3)">Mutation</button>
  </div>
</template>

<script>
import { mapState, mapGetters, mapMutations } from 'vuex'
export default {
  computed: {
    ...mapState({ num: 'count', message: 'msg' }),
    ...mapGetters(['reverseMsg']),
  },
  methods: {
    ...mapMutations(['increate']),
  }
}
</script>

<style>
#app {
  font-family: Avenir, Helvetica, Arial, sans-serif;
  -webkit-font-smoothing: antialiased;
  -moz-osx-font-smoothing: grayscale;
  text-align: center;
  color: #2c3e50;
}

#nav {
  padding: 30px;
}

#nav a {
  font-weight: bold;
  color: #2c3e50;
}

#nav a.router-link-exact-active {
  color: #42b983;
}
</style>
mapMutations 和 mapState 一样可以接收对象参数,且形式是也是一样的,在此不再赘述。
使用 Mutation 改变状态的好处是,集中的一个位置对状态修改,不管在什么地方修改,都可以追踪到状态的修改。可以实现高级的 time-travel 调试功能。

我们需要注意的是,所有的状态更改必须通过 mutation,这么做的目的是可以在devtools中方便调试。最后还需要强调不要在 mutation 中执行异步操作修改 State,否则调试工具无法正常观测到状态的变化,如果想要执行异步的操作,可以使用action。
13、Action
当要执行异步操作时,我们需要在Action中执行异步操作。当异步操作结束后,如果需要更改状态,还要通过提交mutation去修改state,因为所有的状态更改都需要通过mutation。
src/store/index.js
import Vue from 'vue'
import Vuex from 'vuex'

Vue.use(Vuex)

export default new Vuex.Store({
  state: {
    count: 0,
    msg: 'Hello Vuex'
  },
  getters: {
    reverseMsg (state) {
      return state.msg.split('').reverse().join('')
    }
  },
  mutations: {
    increate (state, payload) {
      state.count += payload
    }
  },
  actions: {
    // action中的方法有两个参数,第一个是context上下文,
    // 此对象中有我们需要的state,commit,getters等成员。
    // 第二个参数还是payload,额外的数据
    increateAsync (context, payload) {
      // 用定时器模拟异步操作
      setTimeout(() => {
        context.commit('increate', payload)
      }, 2000)
    }
  },
  modules: {
  }
})
src/app.vue
<template>
  <div id="app">
    <h1>Vuex - Demo</h1>
    count:{{ num }} <br>
    msg: {{ msg }}

    <h2>Getter</h2>
    reverseMsg: {{ reverseMsg }}

    <h2>Mutation</h2>
      <!-- 通过mapMutations后,调用increate只需要传递一个参数即可 -->
    <button @click="increate(3)">Mutation</button>

    <h2>Action</h2>
    <!-- Action的调用,要通过dispatch,和Mutation的调用使用commit类似 -->
    <button @click="$store.dispatch('increateAsync', 5)">Action</button>
  </div>
</template>

<script>
import { mapState, mapGetters } from 'vuex'
export default {
  computed: {
    ...mapState({ num: 'count', message: 'msg' }),
    ...mapGetters(['reverseMsg']),
  },
  methods: {
    ...mapMutations(['increate']),
  }
}
</script>

<style>
#app {
  font-family: Avenir, Helvetica, Arial, sans-serif;
  -webkit-font-smoothing: antialiased;
  -moz-osx-font-smoothing: grayscale;
  text-align: center;
  color: #2c3e50;
}

#nav {
  padding: 30px;
}

#nav a {
  font-weight: bold;
  color: #2c3e50;
}

#nav a.router-link-exact-active {
  color: #42b983;
}
</style>同样,我们可以使用mapActions来优化action在模板中的调用。
<template>
  <div id="app">
    <h1>Vuex - Demo</h1>
    count:{{ num }} <br>
    msg: {{ msg }}

    <h2>Getter</h2>
    reverseMsg: {{ reverseMsg }}

    <h2>Mutation</h2>
    <button @click="increateAsync(6)">Action</button>
  </div>
</template>

<script>
import { mapState, mapGetters, mapMutations, mapActions } from 'vuex'
export default {
  computed: {
    ...mapState({ num: 'count', message: 'msg' }),
    ...mapGetters(['reverseMsg']),
  },
  methods: {
    ...mapMutations(['increate']),
    // mapActions的作用是把this.increateAsync(payload)方法映射为:
    // this.$store.dispatch('increateAsync', payload)
    ...mapActions(['increateAsync']),
  }
}
</script>

<style>
#app {
  font-family: Avenir, Helvetica, Arial, sans-serif;
  -webkit-font-smoothing: antialiased;
  -moz-osx-font-smoothing: grayscale;
  text-align: center;
  color: #2c3e50;
}

#nav {
  padding: 30px;
}

#nav a {
  font-weight: bold;
  color: #2c3e50;
}

#nav a.router-link-exact-active {
  color: #42b983;
}
</style>
14、Module
Module(模块)可以让我们把单一状态树拆分成多个模块,每个模块都可以拥有自己的State、Mutation、Action、Getter甚至嵌套子模块,当状态非常多的时候非常有用。
以购物车的产品模块和购物车模块为例:
src/store/modules/cart.js
const state = {}
const getters = {}
const mutations = {}
const actions = {}

export default {
  state,
  getters,
  mutations,
  actions
}
src/store/modules/products.js
const state = {
  products: [
    { id: 1, title: 'iPhone 11', price: 8000 },
    { id: 2, title: 'iPhone 12', price: 10000 }
  ]
}
const getters = {}
const mutations = {
  setProducts (state, payload) {
    state.products = payload
  }
}
const actions = {}

export default {
  state,
  getters,
  mutations,
  actions
}
src/store/index.js
import Vue from 'vue'
import Vuex from 'vuex'
import products from './modules/products'
import cart from './modules/cart'

Vue.use(Vuex)

export default new Vuex.Store({
  state: {
    count: 0,
    msg: 'Hello Vuex'
  },
  getters: {
    reverseMsg (state) {
      return state.msg.split('').reverse().join('')
    }
  },
  mutations: {
    increate (state, payload) {
      state.count += payload
    }
  },
  actions: {
    increateAsync (context, payload) {
      setTimeout(() => {
        context.commit('increate', payload)
      }, 2000)
    }
  },
  // 通过modules注册products和cart模块,
  // 可以通过store.state.products访问到products模块中的成员。
  // 还把模块中的mutation记录到store的内部属性_mutations中,
  // 可以通过store.commit直接提交模块中的mutation,
  // 可以通过打印store对象查看到store中的state和_mutations、_actions等
  modules: {
    products,
    cart,
  }
})
src/app.vue
<template>
  <div id="app">
    <h1>Vuex - Demo</h1>
    <h2>Module</h2>
    <!-- 第一个products是模块名,第二个products是模块中state的属性 -->
    products: {{ $store.state.products.products }} <br>
    <button @click="$store.commit('setProducts', [])">Mutation</button>
  </div>
</template>
<script>
export default {
  computed: {
  },
  methods: {
  }
}
</script>
<style>
#app {
  font-family: Avenir, Helvetica, Arial, sans-serif;
  -webkit-font-smoothing: antialiased;
  -moz-osx-font-smoothing: grayscale;
  text-align: center;
  color: #2c3e50;
}

#nav {
  padding: 30px;
}

#nav a {
  font-weight: bold;
  color: #2c3e50;
}

#nav a.router-link-exact-active {
  color: #42b983;
}
</style>
现在,我们模块中的action,mutation,getter都直接存储在store中,如果想让我们的模块拥有更好的封装度和复用性,可以给模块开启命名空间,这样在视图中使用使用模块成员时也会更清晰一些,这里推荐使用带命名空间的用法。
src/store/modules/cart.js
const state = {}
const getters = {}
const mutations = {}
const actions = {}

export default {
  // 在导出的对象里设置namespace为true,开启命名空间
  namespaced: true,
  state,
  getters,
  mutations,
  actions
}
src/store/modules/products.js
const state = {
  products: [
    { id: 1, title: 'iPhone 11', price: 8000 },
    { id: 2, title: 'iPhone 12', price: 10000 }
  ]
}
const getters = {}
const mutations = {
  setProducts (state, payload) {
    state.products = payload
  }
}
const actions = {}

export default {
  // 在导出的对象里设置namespace为true,开启命名空间
  namespaced: true,
  state,
  getters,
  mutations,
  actions
}
当开启命名空间后,使用map函数会更加清晰:
src/app.vue
<template>
  <div id="app">
    <h1>Vuex - Demo</h1>
    <h2>Module</h2>
    products: {{ products }} <br>
    <button @click="setProducts([])">Mutation</button>
  </div>
</template>
<script>
export default {
  import { mapState, mapMutations } from 'vuex'
  computed: {
    // 第一个参数是命名空间的名字(即store.modules中的模块名),
    // 第二个参数依然是数组或对象,表示映射的属性
    ...mapState('products', ['products'])
  },
  methods: {
    ...mapMutations('products', ['setProducts'])
  }
}
</script>
<style>
#app {
  font-family: Avenir, Helvetica, Arial, sans-serif;
  -webkit-font-smoothing: antialiased;
  -moz-osx-font-smoothing: grayscale;
  text-align: center;
  color: #2c3e50;
}

#nav {
  padding: 30px;
}

#nav a {
  font-weight: bold;
  color: #2c3e50;
}

#nav a.router-link-exact-active {
  color: #42b983;
}
</style>
15、严格模式
之前在介绍核心概念时,我们提到所有的状态变更必须通过提交mutation,但这仅仅只是一个约定,我们可以随时在组件中获取$store.state.message并进行修改,这从语法层面上来讲是完全没有问题的,但破坏了Vuex的约定。如果在组件中直接修改state,devtools就无法跟踪到这次状态的修改,而开启严格模式之后,如果在组件中直接修改state状态,会直接抛出错误。
src/store/index.js
import Vue from 'vue'
import Vuex from 'vuex'
import products from './modules/products'
import cart from './modules/cart'

Vue.use(Vuex)

export default new Vuex.Store({
  // 开启严格模式
  strict: true,
  state: {
    count: 0,
    msg: 'Hello Vuex'
  },
  getters: {
    reverseMsg (state) {
      return state.msg.split('').reverse().join('')
    }
  },
  mutations: {
    increate (state, payload) {
      state.count += payload
    }
  },
  actions: {
    increateAsync (context, payload) {
      setTimeout(() => {
        context.commit('increate', payload)
      }, 2000)
    }
  },
  modules: {
    products,
    cart
  }
})
src/app.vue
<template>
  <div id="app">
    <h1>Vuex - Demo</h1>
    <h2>strict</h2>
    <button @click="$store.state.msg = 'Hello World'">strict</button>
  </div>
</template>
<script>
</script>
<style>
#app {
  font-family: Avenir, Helvetica, Arial, sans-serif;
  -webkit-font-smoothing: antialiased;
  -moz-osx-font-smoothing: grayscale;
  text-align: center;
  color: #2c3e50;
}

#nav {
  padding: 30px;
}

#nav a {
  font-weight: bold;
  color: #2c3e50;
}

#nav a.router-link-exact-active {
  color: #42b983;
}
</style>
我们点击按钮时,会更改state中的msg,但会在控制台中报出一个错误。
但我们不应该在生产环境下开启严格模式,严格模式会深度检查状态树来检查不合规的状态改变,会影响性能。我们可以在开发环境中启用严格模式,在生产环境中关闭严格模式。
src/store/index.js
import Vue from 'vue'
import Vuex from 'vuex'
import products from './modules/products'
import cart from './modules/cart'

Vue.use(Vuex)

export default new Vuex.Store({
  // 当npm run serve时process.env.NODE_ENV为development
  // 当npm run build时process.env.NODE_ENV为production
  strict: process.env.NODE_ENV !== 'production',
  state: {
    count: 0,
    msg: 'Hello Vuex'
  },
  getters: {
    reverseMsg (state) {
      return state.msg.split('').reverse().join('')
    }
  },
  mutations: {
    increate (state, payload) {
      state.count += payload
    }
  },
  actions: {
    increateAsync (context, payload) {
      setTimeout(() => {
        context.commit('increate', payload)
      }, 2000)
    }
  },
  modules: {
    products,
    cart
  }
})
Vuex模拟实现
1、模拟 Vuex - 基本结构
现在,让我们自己模拟一个简单的Vuex,通过模拟Vuex的实现,从而了解Vuex的工作原理。
先来看一下store中的index.js:
import Vue from 'vue'
// 导入vuex,这里导入的vuex是一个对象,我们要做的就是实现一个自己的vuex对象
// 在这里导入的时候替换成我们写的vuex
import Vuex from 'vuex'

// 这里通过Vue.use注册插件,Vue.use内部会调用对象的install方法
Vue.use(Vuex)

// 这里创建store对象,store是一个类,他的构造函数接收一个对象作为参数,
// 这个对象中的属性分别是:state,getters,mytations,actions(只模拟这些)
export default new Vuex.Store({
  state: {
    count: 0,
    msg: 'Hello World'
  },
  getters: {
    reverseMsg (state) {
      return state.msg.split('').reverse().join('')
    }
  },
  mutations: {
    increate (state, payload) {
      state.count += payload
    }
  },
  actions: {
    increateAsync (context, payload) {
      setTimeout(() => {
        context.commit('increate', payload)
      }, 2000)
    }
  }
})
根据上面的代码,可以知道我们自己实现的vuex中要定义两个内容,一个是install方法,另一个是store类,访问的时候都是通过vuex来访问的,vuex下拥有install和store。
再来看App.vue:
<template>
  <div id="app">
    <h1>Vuex - Demo</h1>
    <!-- 通过$store.state.来访问store中的状态 -->
    count:{{ $store.state.count }} <br>
    msg: {{ $store.state.msg }}

    <h2>Getter</h2>
    <!-- 通过$store.getters.来访问store中的getter -->
    reverseMsg: {{ $store.getters.reverseMsg }}

    <h2>Mutation</h2>
    <!-- 通过$store.commit来提交mutation -->
    <button @click="$store.commit('increate', 2)">Mutation</button>

    <h2>Action</h2>
    <!-- 通过$store.dispatch来分发action -->
    <button @click="$store.dispatch('increateAsync', 5)">Action</button>
  </div>
</template>
在上面的App.vue中是我们最终要实现的效果。为了实现这些功能,我们可以先创建一个叫myvuex的模块,这个模块中需要导出install方法和store类。
我们先把结构创建出来,在src中创建myvuex文件夹,然后创建index.js。
src/myvuex/index.js
// 创建一个变量来存储install中获取的Vue构造函数
let _vue = null
// 先创建一个store类
class Store {}

// 再创建一个install函数,这个函数可以接收两个参数,分别是vue构造函数还有一个额外的选项。
// 我们这里只需要一个vue的构造函数
function install(Vue) {
    // 这里和之前模拟Vue-Router类似,在install中我们可以获取到Vue的构造函数,
    // 后面在store中还需要使用这个构造函数,所以我们可以先存储install中的vue构造函数
    _Vue = Vue
}

// 最终导出一个对象,这个对象包含install和store,这里导出的对象就是外面接收的Vuex对象
export default {
    Store,
    install
}
现在,我们要模拟的vuex的基本结构就创建好了,接下来就让我们先实现install 函数。
2、模拟 Vuex - install
上节中我们已经实现了vuex的基本结构,下面我们就来实现里面的install函数。
我们要模拟的vuex是vue的一个插件,所有的插件都应该具有一个install方法,接下来我们就应该来思考install中要做什么。
在install中我们要把创建vue实例的时候传入的store对象注入到vue原型上的$store,在所有组件中可以直接通过this.$store来获取到vuex中的仓库,从而在所有组件中共享状态。
在install中我们获取不到vue实例,所以这里和之前模拟vue-router一样,通过混入beforeCreate来获取vue实例从而拿到选项中的store对象。
src/myvuex/index.js
let _vue = null
class Store {}

function install(Vue) {
    _Vue = Vue
    // 注册插件时混入beforeCreate来获取vue实例从而拿到选项中的store对象。
    // 当创建vue根实例的时候,就会把store注入所有vue实例上
    _Vue.mixin({
        beforeCreate() {
            // 这里的this就是vue实例。
            // 如果是组件实例的话,没有store选项
            if(this.$options.store) {
                _Vue.prototype.$store = this.$options.store
            }
        }
    })
}

export default {
    Store,
    install
}
3、模拟 Vuex - Store 类
最后,我们再来模拟实现vuex中的Store类。
src/myvuex/index.js
let _vue = null
// 我们先来思考一下Store类应该如何实现,首先应该需要一个构造函数,接收一个对象,
// store中应该有和核心概念对应的属性,分别是state,getters,mutations,actions,
// 并且state是响应式的。还应该有两个方法,一个是commit,还有一个是dispatch,
// 分别是提交mutation和分发action,我们可以先来实现构造函数
class Store {
    constructor (options) {
        // 在构造函数里,我们可以先把options中的成员解构出来
        // 为了防止用户在创建vuex的时候没有传入相应的选项,我们在解构的过程中可以设置默认值。
        const {
            state = {},
            getters = {},
            mutations = {},
            actions = {},
        } = options
        // 接下来我们来初始化store中的属性,先来写state,因为state是响应式的,
        // 我们这里还是通过Vue.observable来对对象进行响应化处理
        this.state = _Vue.observable(state)
        // 接下来是getters,getters是一个对象,对象中具有一些方法,
        // 这些方法都需要接收state参数,并且最终都有返回值,
        // 一般情况下就是对state做简单处理,把处理结果返回,
        // 所以这些方法的作用都是用来获取值。
        // 故而我们可以把这些方法通过Object.defineProperty转换成getters对象中的
        // getter访问器,这里 我们可以直接遍历getters中的所有key,这些key就是方法的名字
        this.getters = Object .create(null)
        Object.keys(getters).forEach(key => {
            // 遍历getters对象中的所有属性,然后调用Object.defineProperty
            // 把对应的key注册到this.getters对象中
            Object.defineProperty(this.getters, key, {
                // 返回通过key在getters中获取到的方法的执行结果
                get: () => getters[key](state)
            })
        })
        // 把mutations和actions存储到对应的属性中,在commit和dispatch中需要获取。
        // 这里的属性是内部属性,我们在属性名前加上下划线标识私有,不希望外部访问。
        // 在打印store对象时也会出现这样的属性
        this._mutations = mutations
        this._actions = actions
    }
    // 最后来实现两个方法
    // commit需要两个参数,第一个是type,就是_mutations中方法的名字,
    // 第二个是payload,是调用方法的时候传入的参数。
    commit(type, payload){
        this._mutations[type](this.state, payload)
    }
    // 最后是dispatch,他和commit类似,不过第一个参数是context,我们用this简单模拟,
    // this中有我们需要的state,getters,commit等。
    dispatch(type, payload){
        this._actions[type](this, payload)
    }
}

function install(Vue) {
    _Vue = Vue
    _Vue.mixin({
        beforeCreate() {
            if(this.$options.store) {
                _Vue.prototype.$store = this.$options.store
            }
        }
    })
}

export default {
    Store,
    install
}
vuex的简单模拟到此就实现完成了,在测试前我们回到store中的index.js中进行导入。
src/store/index.js
import Vue from 'vue'
// myvuex内部导出一个对象,这里依旧通过Vuex来接收,
// Vuex对象中有两个成员,分别是install方法还有store类
import Vuex from '../myvuex'

Vue.use(Vuex)

export default new Vuex.Store({
  state: {
    count: 0,
    msg: 'Hello World'
  },
  getters: {
    reverseMsg (state) {
      return state.msg.split('').reverse().join('')
    }
  },
  mutations: {
    increate (state, payload) {
      state.count += payload
    }
  },
  actions: {
    increateAsync (context, payload) {
      setTimeout(() => {
        context.commit('increate', payload)
      }, 2000)
    }
  }
})
App.vue
<template>
  <div id="app">
    <h1>Vuex - Demo</h1>
    count:{{ $store.state.count }} <br>
    msg: {{ $store.state.msg }}

    <h2>Getter</h2>
    reverseMsg: {{ $store.getters.reverseMsg }}

    <h2>Mutation</h2>
    <button @click="$store.commit('increate', 2)">Mutation</button>

    <h2>Action</h2>
    <button @click="$store.dispatch('increateAsync', 5)">Action</button>
  </div>
</template>


